Wednesday, February 12, 2014

 Portrait Photography Tips

Portrait Photography Tips

How do you take Portraits that have the ‘Wow’ factor?
I want to look at some ways to break out of the mold and take striking portraits by breaking (or at least bending) the rules and adding a little randomness into your portrait photography.

1. Alter Your Perspective

Most portraits are taken with the camera at (or around) the eye level of the subject. While this is good common sense – completely changing the angle that you shoot from can give your portrait a real WOW factor.
10 Ways to Take Stunning Portraits
Get up high and shoot down on your subject or get as close to the ground as you can and shoot up. Either way you’ll be seeing your subject from an angle that is bound to create interest.
10 Ways to Take Stunning Portraits\

2. Play with Eye Contact

It is amazing how much the direction of your subject’s eyes can impact an image. Most portraits have the subject looking down the lens – something that can create a real sense of connection between a subject and those viewing the image. But there are a couple of other things to try:
A. Looking off camera – have your subject focus their attention on something unseen and outside the field of view of your camera. This can create a feeling of candidness and also create a little intrigue and interest as the viewer of the shot wonders what they are looking at. This intrigue is particularly drawn about when the subject is showing some kind of emotion (ie ‘what’s making them laugh?’ or ‘what is making them look surprised?’). Just be aware that when you have a subject looking out of frame that you can also draw the eye of the viewer of the shot to the edge of the image also – taking them away from the point of interest in your shot – the subject.
10 Ways to Take Stunning Portraits


B. Looking within the frame – alternatively you could have your subject looking at something (or someone) within the frame. A child looking at a ball, a woman looking at her new baby, a man looking hungrily at a big plate of pasta…. When you give your subject something to look at that is inside the frame you create a second point of interest and a relationship between it and your primary subject. It also helps create ‘story’ within the image.
10 Ways to Take Stunning Portraits

3. Break the Rules of Composition

There are a lot of ‘rules’ out there when it comes to composition and I’ve always had a love hate relationship with them. My theory is that while they are useful to know and employ that they are also useful to know so you can purposely break them – as this can lead to eye catching results.
The Rule of Thirds is one that can be effective to break – placing your subject either dead centre can sometimes create a powerful image – or even creative placement with your subject right on the edge of a shot can sometimes create interesting images.
10 Ways to Take Stunning Portraits

Another ‘rule’ that we often talk about in portrait photography is to give your subject room to look into. This can work really well – but again, sometimes rules are made to be broken.
10 Ways to Take Stunning Portraits

4. Experiment with Lighting

Another element of randomness that you can introduce to your portraits is the way that you light them. There are almost unlimited possibilities when it comes to using light in portraits.
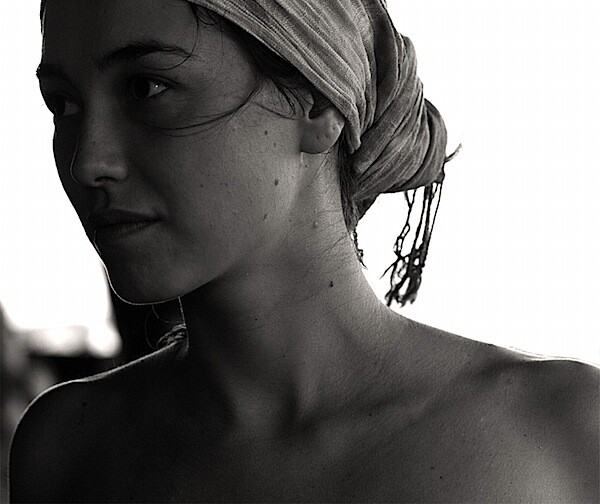
Side-lighting can create mood, back lighting and silhouetting your subject to hide their features can be powerful.
portrait-lighting.jpg

Using techniques like slow synch flash can create an impressive wow factor.
Portrait-Slow-Sync-Flash

5. Move Your Subject Out of their Comfort Zone

I was chatting with a photographer recently who told me about a corporate portrait shoot that he had done with a business man at his home. They’d taken a lot of head and shoulder shots, shots at his desk, shots in front of framed degrees and other ‘corporate’ type images. They had all turned out fairly standard – but there was nothing that really stood out from the crowd.
The photographer and the subject agreed that there were plenty of usable shots but they wanted to create something ‘special’ and out of the box. The photographer suggested they try some ‘jumping’ shots. The subject was a little hesitant at first but stepped out into the uncomfortable zone and dressed in his suit and tie started jumping!
The shots were amazing, surprising and quite funny. The shoot culminated with the subject jumping in his pool for one last image!
While this might all sound a little ‘silly’ the shots ended up being featured in a magazine spread about the subject. It was the series of out of the box images that convinced the magazine he was someone that they’d want to feature.
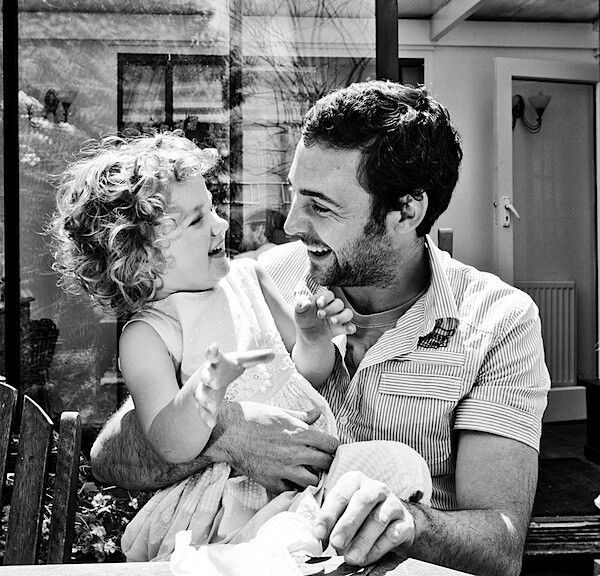
portrait-comfort-zone.jpg

6. Shoot Candidly

Sometimes posed shots can look somewhat…. posed. Some people don’t look good in a posed environment and so switching to a candid type approach can work.
Photograph your subject at work, with family or doing something that they love. This will put them more at ease and you can end up getting some special shots with them reacting naturally to the situation that they are in. You might even want to grab a longer zoom lens to take you out of their immediate zone and get really paparazzi with them.
I find that this can particularly work when photographing children.
portrait-candid.jpg


7. Introduce a Prop

Add a prop of some kind into your shots and you create another point of interest that can enhance your shot.
Yes you might run the risk of taking too much focus away from your main subject but you could also really add a sense of story and place to the image that takes it in a new direction and gives the person you’re photographing an extra layer of depth that they wouldn’t have had without the prop.
portrait-prop.jpg

8. Focus Upon One Body Part – Get Close Up

Get a lens with a long focal length attached to your camera – or get right in close so that you can just photograph a part of your subject. Photographing a person’s hands, eyes, mouth or even just their lower body… can leave a lot to the imagination of the viewer of an image.
Sometimes it’s what is left out of an image that says more than what is included.
portrait-close up.jpg

9. Obscure Part of your Subject

A variation on the idea of zooming in on one part of the body is to obscure parts of your portrait subject’s face or body. You can do this with clothing, objects, their hands or just by framing part of them out of the image.
Doing this means that you leave a little to the imagination of the image’s viewer but also focus their attention on parts of your subject that you want them to be focused upon.
portrait-obscure.jpg

10. Take a Series of Shots

Switch your camera into ‘burst’ or ‘continuous shooting’ mode and fire off more than one shot at a time.
In doing this you create a series of images that could be presented together instead of just one static image.
This technique can work very well when you’re photographing children – or really any active subject that is changing their position or pose in quick succession.
portrait-continuous shooting.jpg

Tips for Beginner Photographers

1. Don’t go crazy buying the most expensive equipment right away.

It’s possible to get very nice photos with an inexpensive point and shoot. See these examples on Flickr. The more photos you take, the more you’ll know about what kind of camera to get when it’s time to upgrade.

2. Consider a tripod.

On the other hand, an inexpensive tripod is worth getting, especially if you have shaky hands like mine. When I got a tripod, my satisfaction with my shots skyrocketed. For even more stability, use your camera’s timer function with a tripod (read our introduction to tripods).

3. Keep your camera with you all the time.

Photo ops often come when you least expect it. If you can keep your equipment relatively simple – just a small camera bag and a tripod – you might be able to take advantage of some of those unexpected opportunities. Or, if your phone has a camera, use it to take “notes” on scenes you’d like to return to with your regular camera.

4. Make a list of shots you’d like to get.

For those times you can’t carry your camera around, keep a small notebook to jot down places you’d like to come back and photograph. Make sure to note any important details, like the lighting, so you can come back at the same time of day or when the weather’s right. If you don’t want to carry a notebook, send yourself an email using your cell phone with Jott.com.

5. Don’t overlook mundane subjects for photography.

You might not see anything interesting to photograph in your living room or your backyard, but try looking at familiar surroundings with fresh eyes. You might catch an interesting trick of the light or find some unexpected wildflowers in your yard. Often a simple subject makes the best shot.
6. Enjoy the learning process.
The best part of having a hobby like photography is never running out of things to learn. Inspiration is all around you. Look at everything with the eyes of a photographer and you’ll see opportunities you never noticed before.

7. Take advantage of free resources to learn.

Browse through Flickr or websites like the Digital Photography School Forum for inspiration and tips. Also, your local library probably has a wealth of books on all types of photography. If you’re interested in learning about post-processing, give free software like the GIMP a try.


8. Experiment with your camera’s settings.

Your point and shoot may be more flexible and powerful than you know. Read the manual for help deciphering all those little symbols. As you explore, try shooting your subjects with multiple settings to learn what effects you like. When you’re looking at your photos on a computer, you can check the EXIF data (usually in the file’s properties) to recall the settings you used.

9. Learn the basic rules.

The amount of information about photography online can be overwhelming. Start with a few articles on composition. Be open to what more experienced photographers have to say about technique. You have to know the rules before you can break them.

10. Take photos regularly.

Try to photograph something every day. If you can’t do that, make sure you take time to practice regularly, so you don’t forget what you’ve learned. An excellent way to motivate yourself is by doing the weekly assignments in the DPS Forum.

11. Don’t be afraid to experiment.

If you’re using a digital camera, the cost of errors is free. Go crazy – you might end up with something you like. You’ll certainly learn a lot in the process

Top 10 Photography Tips

1

Compose in Thirds

To use the rule of thirds, imagine four lines, two lying horizontally across the image and two vertical creating nine even squares. Some images will look best with the focal point in the center square, but placing the subject off center will often create a more aesthetically composed photograph. When a photograph is composed using the rule of thirds the eyes will wander the frame. A picture composed by the rule of thirds is more interesting and pleasing to the eye.
2

Avoid Camera Shake

 
 Camera shake or blur is something that can plague any photographer and here are some ways to avoid it. First, you need to learn how to hold your camera properly; use both hands, one around the body and one around the lens and hold the camera close to your body for support. Also make sure you are using a shutter speed that matches the lens focal length. So if you’re using a 100mm lens, then your shutter speed should be no lower than 1/100th of a second. Use a tripod or monopod whenever possible. In lieu of this, use a tree or a wall to stabilize the camera


.
3

The Sunny 16 Rule

The idea with the Sunny 16 rule is that we can use it to predict how to meter our camera on a sunny outdoor day. So when in that situation, choose an aperture of f/16 and 1/100th of a second shutter speed (provided you are using ISO 100). You should have a sharp image that is neither under or over exposed. This rule is useful if you don’t have a functioning light meter or if your camera doesn’t have an LCD screen to review the image.
4

Use a Polarizing Filter

If you can only buy one filter for your lens, make it a polarizer. This filter helps reduce reflections from water as well as metal and glass; it improves the colors of the sky and foliage, and it will protect your lens too. There’s no reason why you can’t leave it on for all of your photography. The recommended kind of polarizer is circular because these allow your camera to use TTL (through the lens) metering (i.e. Auto exposure).
5

Create a Sense of Depth

When photographing landscapes it really helps to create a sense of depth, in other words, make the viewer feel like they are there. Use a wide-angle lens for a panoramic view and a small aperture of f/16 or smaller to keep the foreground and background sharp. Placing an object or person in the foreground helps give a sense of scale and emphasizes how far away the distance is. Use a tripod if possible, as a small aperture usually requires a slower shutter speed.
6

Use Simple Backgrounds

The simple approach is usually the best in digital photography, and you have to decide what needs to be in the shot, while not including anything that is a distraction. If possible, choose a plain background – in other words, neutral colors and simple patterns. You want the eye to be drawn to the focal point of the image rather than a patch of color or an odd building in the background. This is vital in a shot where the model is placed off center.
7

Don't Use Flash Indoors

Flash can look harsh and unnatural especially for indoor portraits. Therefore, there are various ways you can take an image indoors without resorting to flash. First, push the ISO up – usually ISO 800 to 1600 will make a big difference for the shutter speed you can choose. Use the widest aperture possible – this way more light will reach the sensor and you will have a nice blurred background. Using a tripod or an I.S. (Image Stabilization) lens is also a great way to avoid blur.
8

Choose the Right ISO

The ISO setting determines how sensitive your camera is to light and also how fine the grain of your image. The ISO we choose depends on the situation – when it’s dark we need to push the ISO up to a higher number, say anything from 400 – 3200 as this will make the camera more sensitive to light and then we can avoid blurring. On sunny days we can choose ISO 100 or the Auto setting as we have more light to work with.
9

Pan to Create Motion

If you want to capture a subject in motion, then use the panning technique. To do this, choose a shutter speed around two steps lower than necessary – so for 1/250, we’d choose 1/60. Keep your camera on the subject with your finger half way down on the shutter to lock the focus and when ready, take the photo, remembering to follow them as they move. Use a tripod or monopod if possible to avoid camera shake and get clear movement lines.
10

Experiment with Shutter Speed

Don’t be afraid to play with the shutter speed to create some interesting effects. When taking a night time shot, use a tripod and try shooting with the shutter speed set at 4 seconds. You will see that the movement of the object is captured along with some light trails. If you choose a faster shutter speed of say 1/250th of a second, the trails will not be as long or bright; instead you will freeze the action. This technique works well if you are using a tripod and if you are photographing a moving object.
Top 10 Photography Mistakes

Top 10 Photography Mistakes

       There are certain photography problems and mistakes that commonly occur for new photographers .The good news is that many of these mistakes are easily corrected with a bit of know how.


1

Blurry Pictures

Top Ten Digital Photography Mistakes-Blurry pictures
One of the top complaints from amateur photographers is that their images have come out blurry. The simple answer to this problem usually is that there isn’t enough light reaching the sensor, so the camera struggles to take a sharp image. Various ways to solve this issue include using a tripod or a monopod (a must in low light conditions!), choosing a higher ISO setting for faster shutter speeds or using flash to freeze any movement.
2

Too Much Contrast

Top Ten Digital Photography Mistakes-Too much contrast
A photograph with too much contrast has a strong difference between light (highlight) and darker (shadow) areas of the image. This is very apparent in photographs taken on a sunny day. Use flash to fill in the dark shadowy areas of the image and try underexposing the image by one or two stops to see the difference it makes.
3

Red-Eye

Close-up image of a smiling, attractive, college-aged woman with dramatic lighting
Although red-eye can easily be corrected with an image editing software, it’s a great idea to know how to prevent it from occurring. Red-eye appears commonly in light-eyed people when the camera flash reflects off the retinas in their eyes. You can prevent red-eye by avoiding your camera's built-in flash whenever possible, also many cameras have an automatic red-eye reduction mode. Another technique is to have your subject look away from the camera for the photo, in order to avoid the reflection in their eyes. One last trick is if the room can be made brighter to allow maximum light into the subject’s eyes, their pupils will shrink due to the brighter light. Though for most situations, this may not be practical.
4

Off-Colors

Top Ten Digital Photography Mistakes-Off colors
Off-colors, or color casts are a well known problem in digital photography. In digital imaging we can use the white balance (WB) settings to deal with this problem. Choose “auto” or the proper WB settings for the scenario. For example, an indoor photograph tends to look orange because the incandescent (tungsten) light bulb emits “warm” or orange light. The tungsten setting devised for this scenario will add blue to balance it out.
5

Less is More

Top Ten Digital Photography Mistakes-Less is more
When framing and composing our photograph, we want to create something interesting for the eye but at the same time avoid excessive distractions. Normally, one main focal point or area is enough. If you have a focal point in the background and a distraction (like rocks) in the foreground, crop the image by zooming in to avoid the distracting item. This effect also may be done later with your image editing software. The point is to have a photo where the eye is drawn to the main attraction.
6

Subject is Too Far

Top Ten Digital Photography Mistakes-Subject is too far
In every photograph we shoot, we want something engaging in the frame. If your subject is too far away, it will not make much impact. You can move closer by using a good quality telephoto zoom lens or we can crop the image later with your image editing software. Remember to shoot the image at the highest resolution possible because cropping reduces the quality.
7

Low Resolution

Top Ten Digital Photography Mistakes-Low Resolution
Shooting at a low resolution may allow you to store more images on your memory card, but it is a bad idea. Using a low resolution setting means that the image quality will suffer, and you won’t be able to print large photographs without noticing the pixels. Additionally, every time you save a jpeg file it loses some quality. If you start off with a small file, your editing options will be very limited. Buy additional memory cards and take your photos with higher resolution and avoid low quality files!
8

Too Much Noise

Top Ten Digital Photography Mistakes-Too Much Noise
Digital noise is analogous to grain on a film photograph, those unsightly little speckles on your image. The higher the ISO the more noise will appear, and the more you enlarge the image the more you can see noise. Night time images are prone to noise as the camera struggles to record detail. To reduce noise, use the largest image quality setting and always use a tripod so that you can choose the lowest ISO setting without causing blur.
9

Underexposed Pictures

Top Ten Digital Photography Mistakes-Underexposed
An underexposed image is one that is too dark because there wasn’t enough light reaching the sensor when the image was taken. If you see on your LCD screen that an image looks too shadowy and underexposed, you can try opening the aperture to allow more light in. You can also adjust the exposure on a DSLR, selecting the ‘+’ to add more light, usually in ½ stop increments.
10

Overexposed Pictures

Top Ten Digital Photography Mistakes-Overexposed
If your photograph is too bright and lacking in detail, then it is overexposed. This means there is too much light hitting the sensor. Overexposure can be particularly bad on bright days or with light colored subjects. To correct for overexposure, you can try underexposing the image by choosing -0.5 or -1 and seeing if more detail has been retained. Additionally, use spot metering for accurate results - pick a grey mid-toned area in your image as the guideline.